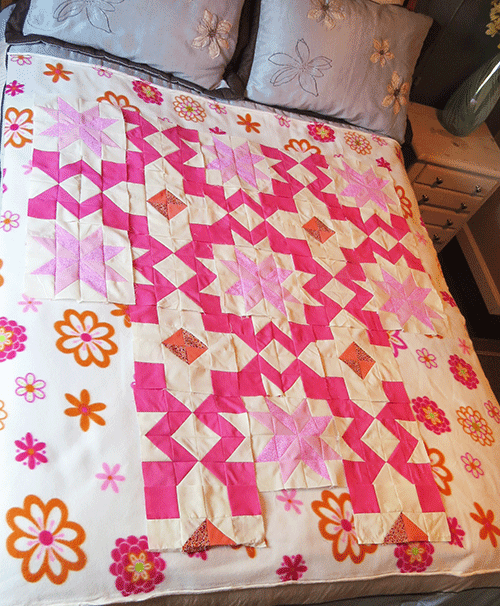
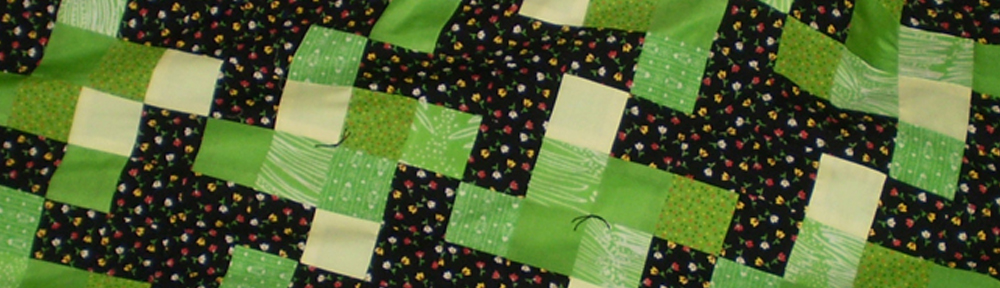
Hakuna Matata

Hakuna-Matata

Hakuna Matata
June 2016

Do you ever purchase a super cute fabric that you just can’t resist, but then find that it sits in your stash, and for some reason, you seem to be avoiding it? In this case, the fabric is a beautiful Julia Cairns African inspired design. Each time I saw it there in my stash, beckoning me, I wasn’t quite sure how to do justice to the fabric, as each of the animal blocks is a different size. But then the idea finally came to me: a 9-patch might be the answer.

A standard 9-patch is such a perfect block pattern because it so flexible. The color palette was pulled from the animal print – blues, gold and greens – taken from a variety of leftover pieces from other past quanket projects.

The name Hakuna Matata was inspired by the animal print, and from a Corrie ten Boom quote I recently came across:

Worrying is carrying tomorrow’s load with today’s strength – carrying two days at once. It is moving into tomorrow ahead of time. Worrying does not empty tomorrow of its sorrow; it empties today of its strength.

This quanket was donated to the County of Ventura, Children & Family Services, for a foster child in June 2016.

Advertisement

My Favorites from 2015

As 2015 winds down to an end, I am pleased to have donated a total of 19 quilts to foster kids this year, and each done in a different design! Choosing my 5 favorites is difficult, but here they are, in no particular order:

Flower Power – August 2015
Star surround quilt

Marigolds – November 2015
medallion quilt

Papa Bear – December 2015
bear paw quilt

Flamingo Floyd – May 2015
charity quilt

Celebration – March 2015
bricks and stepping stones quilt

Papa Bear

bear paw quilt

Papa Bear
December 2015

I recently read a quilter’s comment that there are “so many quilts to try and so little time“, which I can totally relate to! Papa Bear marks my 57th quilt donation – not counting the numerous family and friends quilts I have made over the years – and this is the first time I have done a Bear’s Paw quilt design.

The inspiration for the name and color palette came from a family trip to Big Bear over the Thanksgiving holiday: the crisp blue sky, the evergreen pine trees and the snow that fell all day on Friday. Living in Southern California, it is a treat to be able to drive only a few hours and to enjoy a few days in the snow. Yes, we are spoiled. The majority of the fabrics were pulled from my scraps bin and represent too many past projects and pieces of the past to list here. Overall, there is a lot of good mojo that is at work in this quilt!

This quanket, along with Baby Bear and Mama Bear are being donated via the Hands2Help Challenge 2016 and will go to the Yukon Women’s Transition Home in Whitehorse, Yukon. I am inspired by these words on their website, “Kids deserve to feel safe“. These are words that fuel me to make and donate quilts for kids.

Hands2Help Charity Quilt Challenge

Quilting is more fun than Housework

Marigolds

medallion quilt

Marigolds
November 2015

In October, during a road trip around Oregon, I had the opportunity of visiting the Latimer Quilt and Textile Center in Tillamook. If you are a quilter, and are visiting this area, this is certainly a “must see” for the itinerary. The museum includes beautiful quilts on display, as well as numerous other textile arts. They also have a gift shop where I acquired the centerpiece for this quilt.

The cross-stitched sampler centerpiece had an identical twin, each measuring about 12″x12″, and while the orange and brown stitching was complete on both, the background had not been finished. Like my Lovely Flower Baskets in the Window quanket, I was amazed at the time someone must have spent on these, and wondered at their plan for them. As a fan of re-purposing, I knew that these were destined to make their way into my Love Hugs (Pieces of the Past) quilt project. So, I scooped up these beautiful little treasures, and figured I would finish cross-stitching the background.

I chose to do this as a medallion quilt, as I wanted the cross-stitched center block to be the main attraction. The Fall-colored leaves material used in the last large border and throughout, was a leftover from my sister Lynn’s donation for my Country Fair quilt, and the large gold triangles was material I had received for participating in the 2015 Hands2Help Challenge.

This quanket was donated to the County of Ventura, Children & Family Services, for a foster child in December 2015.

Don’t Fence Me In

Quankets for foster kids

Don’t Fence Me In
September 2015

This is my 54th quilt donation to foster children, and it, along with my last two quankets Country Fair and Flower Power, will be donated to the County of Ventura, Children & Family Services, via the Children’s Services Auxiliary of Ventura County this month.

This fence rail block pattern went together pretty quickly. Using the strip quilting technique and having very few intersecting seams make this a really nice pattern for beginners. I liked how the design used different strip widths, and by randomly placing the fabrics, it turned out very different from my Switchbacks quanket that also is a fence rail pattern.

The solid green fabric was a leftover fabric from Edith, while the rest were new fabrics from the local fabric shop’s remnants bin. The inspiration for the name came from the old Cole Porter song, Don’t Fence Me In. As someone who loves backpacking, sailing and road trips, I feel a personal connection to the lyrics,

Oh, give me land, lots of land under starry skies
Don’t fence me in
Let me ride through the wide country that I love
Don’t fence me in

Don’t Fence Me In will be included in this year’s 100 Quilts for Kids program, which runs through the end of September.

100 Quilts for Kids

Country Fair

Hourglass block quilt

Country Fair
September 2015

This quanket was donated in September to the County of Ventura, Children & Family Services, and will go to a foster child. It will also be included in this year’s 100 Quilts for Kids program, which runs through the end of September.

This hourglass block pattern quanket is a riot of such fun colors and patterns! Each summer, I host a family get together at our home, and this year’s theme was Country Fair. The menu included homemade lemonade, fresh salads, peach and apple pies, and so much more yummy food! In addition to folks bringing their favorite ‘Country Fair’ dish, I also asked everyone to bring a scrap of fabric that I would make into a “family quilt”.

With no guidelines other than for the fabric to be a cotton or cotton-blend, and bigger than 12″x12″, as you can see, I got quite a diversity of colors and fabrics. Some brought fat quarters, while one sister brought an old, favorite sundress, another a vintage apron she had gotten from Granny, and my daughter contributed one of my grandson’s onesies.

I chose the hourglass block pattern for two reasons: first, it lends itself to using a lot of different colors and patterns; and second, I felt it aptly gave a nod to the concept of time – the passing of time, and how precious time spent with family is! The other thing I liked about the hourglass block is that it allowed me to have everyone’s contributed fabric touch each others, symbolic of how we each touch one another’s lives.

100 Quilts for Kids

Flower Power

Star surround quilt

Flower Power
August 2015

I believe this quilt qualifies for my ‘most pieces’ pieced quilt, coming in at just over 800 pieces pieced! Before this one, my What’s a Zig without a Zag quilt was my ‘most pieces’ quilt at 504 total pieces. While it was quite a bit of work to design and piece this one, it was very rewarding to see it come together. I used this quilt to describe how I make quankets, hoping that it inspires others to make and donate quankets to foster kids. Quankets are a great project for those that love the piecing aspect of quilting, but perhaps don’t have the tools, training or patience to finish in the traditional quilting method.

This quilt incorporates some new and some past project scraps. The hourglass blocks incorporated some scrap fabric from Edith, and from a quilt I made years ago for my nephew. Some of the muslin was leftover from the fitting pattern for the wedding dress I made for my daughter nine years ago.

This was donated in September to the County of Ventura, Children & Family Services, and will go to a foster child. It will also be included in this year’s 100 Quilts for Kids program.

100 Quilts for Kids

Part 3: Making a Quanket

Making a quanket
August 2015

I have finally completed piecing and joining all my blocks. Now it is time to move on to finishing.

  1. I chose to do a 5/8″ edge binding because I did not want to distract too much from the overall design of the quilt. In the picture here, I have already sewn the edge binding to the top, and am ironing the seam that will be turned to the back. I pin the binding about every six inches, just to temporarily hold my turned seam in place.
    Quanket
  2. Once I have the binding ironed and pinned, I then use the floor in the guest room to lay out the quilt, and block it – somewhat similar to blocking a sweater. I lay it right side down, and working from the center out, start to square-up the blocks and rows, all the way to the outer edges. I find that working on the carpet provides a bit of tension, and helps to hold the quilt nicely as I make the minor adjustments to bring everything into square.
    quanket
  3. For the fleece backing, I begin by cutting 1″ off one of the salvage edges, and then squaring the edge that is to one side or the other, like this: |_
  4. With the right side of the fleece facing up, I lay the fleece on top of the quilt, aligning the two squared edges to two edges of the quilt, again like this: |_
  5. I then pin these first two edges, pinning the fleece to the top about every 2-3 inches. *Sharp pins are essential! I pin from the quilt (top) side, as I will ultimately stitch in the ditch to finish the binding. Here is a great tutorial for this technique > stitch in ditch binding <
  6. Once I have the first two squared fleece edges pinned to the top, I then move to my third side. In the picture shown below, I am in the process of trimming the fleece to meet the edge of the top’s third side. While I could measure my top and cut my fleece beforehand, I find that since fleece has a fair amount of stretch to it, I get better results if I cut the final two sides of the fleece at this stage. I find that having it laid out flat on the floor lets the fabric lay more naturally, and not be accidentally stretched, as it tends to do if I do this on my cutting table – which is not big enough for the piece to be opened to its full size. I then pin the third edge, and then move on to trimming and pinning the fourth edge of the fleece.
    quanket
  7. Once all four edges are pinned to the top, I then turn the quilt over, and block it again so that it is laying nice and square on the floor. I will ultimately tie the quilt top to the fleece backing after sewing the binding, so to prepare for this, I pin the top to the back while I have it laid out flat, as shown in the picture below. I like to place ties no more than 12″ apart, and I place the ties to compliment the overall quilt design. For this star surround pattern, I will tie in the center of the light pink stars, and in the center of the hourglass blocks, giving me a total of 13 ties.
    quanket

Part 2: Making a Quanket

quanket-part-2

Making a quanket
August 2015

I have now moved the blocks for this quanket from my design wall to the guest bed. Before completing the estimated needed blocks, I like to see how the design is coming together, and where I may want to make adjustments.

  1. As you can see in the picture, if I do the planned six full blocks down, I end with my center light pink stars not getting the hot pink star surround around them. So instead of doing six full blocks for the length, I will have five full blocks and add a half block at the top and bottom.
  2. The same will happen with the width. As reference, the top three rows have five blocks across. I will add a single row^ (1/4 of a block) on each side, to continue the pattern to the full width of the fleece backing.
    *The blocks are technically built off a standard 16-patch block pattern. I chose to have them finish at 9″. So, adding a row^ will add 2.25″ to each side.

I had calculated this quanket finishing at 4’x5′, but as it started to take shape on my design wall, I could see that I wanted the light pink stars to get the hot pink all the way around them. This adjustment will make the quilt finish more square than rectangle, but that’s okay. Luckily the fleece backing can accommodate the extra width.

Sometimes my quilts do not finish quite as I originally pictured in my head or sketched out. Between using scrap fabrics and sometimes getting lost in the calculations, I like to consider my process as being organic!

Part 1: Making a Quanket

Quanket

Making a quanket
August 2015

While I usually just post my finished quilts, I thought it might be fun to capture a bit of the process for making a quanket.

  1. This one began with the choice of the fleece backing, shown in the top of the picture: light and hot pink flowers, complimented with rust colored flowers. Sometimes I will begin a quilt by choosing the fabrics I want to use, sometimes a quilt block pattern I like, but in this case, fleece came first.
  2. Then off I went to my leftover stash and scraps drawers to see what I had in the pink and orange color values, and chose, so far, what you see in the picture.
  3. Next came finding a pattern that would work not only with the fabrics I had on hand, but also a design that would work nicely with the design on the fleece. This was a little more challenging than most of my other quilts that use solid color fleece for the backing. I liked Melissa Corry’s Star Surround quilt pattern, as it almost mirrors the flower design on the fleece.
  4. And now it is block building time. 9 down and 21 to go! If I did my calculations correctly, this will finish at 4’x5′.

I sew in a closet in my office. Yes, a closet. It is just a normal closet, about 2′ deep x 6′ wide. Years ago, when space here at home was at a premium, I converted the closet in my office to house my table sewing machine, supplies, etc., and put bi-fold doors on the closet to make the opening bigger when the doors are open. I have recently added felt to the bi-fold door (shown in the picture), which works exceptionally well for my design wall. Since it is on the closet door that is literally about 2 feet from my left hand, it is easy to sew a block and then stick it on the door!

My husband teases me that since we are now empty nesters, that we have plenty of room for me to ‘spread out’ and not sew in a closet. But, I’ve gotten so used to it over the years, I’m not sure what I would do with all that extra space around me! 🙂