Country Fair

Hourglass block quilt

Country Fair
September 2015

This quanket was donated in September to the County of Ventura, Children & Family Services, and will go to a foster child. It will also be included in this year’s 100 Quilts for Kids program, which runs through the end of September.

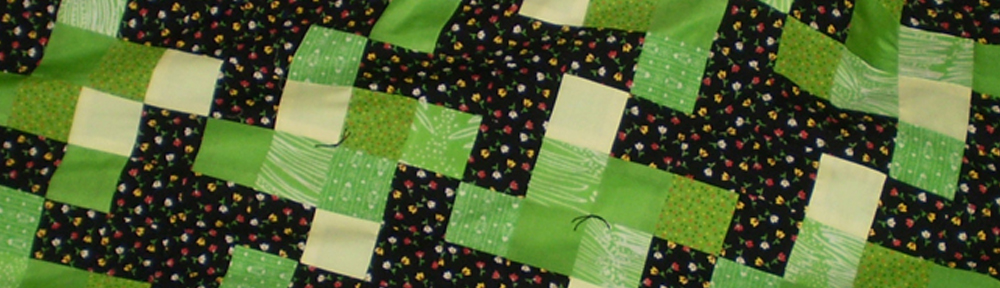
This hourglass block pattern quanket is a riot of such fun colors and patterns! Each summer, I host a family get together at our home, and this year’s theme was Country Fair. The menu included homemade lemonade, fresh salads, peach and apple pies, and so much more yummy food! In addition to folks bringing their favorite ‘Country Fair’ dish, I also asked everyone to bring a scrap of fabric that I would make into a “family quilt”.

With no guidelines other than for the fabric to be a cotton or cotton-blend, and bigger than 12″x12″, as you can see, I got quite a diversity of colors and fabrics. Some brought fat quarters, while one sister brought an old, favorite sundress, another a vintage apron she had gotten from Granny, and my daughter contributed one of my grandson’s onesies.

I chose the hourglass block pattern for two reasons: first, it lends itself to using a lot of different colors and patterns; and second, I felt it aptly gave a nod to the concept of time – the passing of time, and how precious time spent with family is! The other thing I liked about the hourglass block is that it allowed me to have everyone’s contributed fabric touch each others, symbolic of how we each touch one another’s lives.

100 Quilts for Kids

Flower Power

Star surround quilt

Flower Power
August 2015

I believe this quilt qualifies for my ‘most pieces’ pieced quilt, coming in at just over 800 pieces pieced! Before this one, my What’s a Zig without a Zag quilt was my ‘most pieces’ quilt at 504 total pieces. While it was quite a bit of work to design and piece this one, it was very rewarding to see it come together. I used this quilt to describe how I make quankets, hoping that it inspires others to make and donate quankets to foster kids. Quankets are a great project for those that love the piecing aspect of quilting, but perhaps don’t have the tools, training or patience to finish in the traditional quilting method.

This quilt incorporates some new and some past project scraps. The hourglass blocks incorporated some scrap fabric from Edith, and from a quilt I made years ago for my nephew. Some of the muslin was leftover from the fitting pattern for the wedding dress I made for my daughter nine years ago.

This was donated in September to the County of Ventura, Children & Family Services, and will go to a foster child. It will also be included in this year’s 100 Quilts for Kids program.

100 Quilts for Kids

Part 3: Making a Quanket

Making a quanket
August 2015

I have finally completed piecing and joining all my blocks. Now it is time to move on to finishing.

  1. I chose to do a 5/8″ edge binding because I did not want to distract too much from the overall design of the quilt. In the picture here, I have already sewn the edge binding to the top, and am ironing the seam that will be turned to the back. I pin the binding about every six inches, just to temporarily hold my turned seam in place.
    Quanket
  2. Once I have the binding ironed and pinned, I then use the floor in the guest room to lay out the quilt, and block it – somewhat similar to blocking a sweater. I lay it right side down, and working from the center out, start to square-up the blocks and rows, all the way to the outer edges. I find that working on the carpet provides a bit of tension, and helps to hold the quilt nicely as I make the minor adjustments to bring everything into square.
    quanket
  3. For the fleece backing, I begin by cutting 1″ off one of the salvage edges, and then squaring the edge that is to one side or the other, like this: |_
  4. With the right side of the fleece facing up, I lay the fleece on top of the quilt, aligning the two squared edges to two edges of the quilt, again like this: |_
  5. I then pin these first two edges, pinning the fleece to the top about every 2-3 inches. *Sharp pins are essential! I pin from the quilt (top) side, as I will ultimately stitch in the ditch to finish the binding. Here is a great tutorial for this technique > stitch in ditch binding <
  6. Once I have the first two squared fleece edges pinned to the top, I then move to my third side. In the picture shown below, I am in the process of trimming the fleece to meet the edge of the top’s third side. While I could measure my top and cut my fleece beforehand, I find that since fleece has a fair amount of stretch to it, I get better results if I cut the final two sides of the fleece at this stage. I find that having it laid out flat on the floor lets the fabric lay more naturally, and not be accidentally stretched, as it tends to do if I do this on my cutting table – which is not big enough for the piece to be opened to its full size. I then pin the third edge, and then move on to trimming and pinning the fourth edge of the fleece.
    quanket
  7. Once all four edges are pinned to the top, I then turn the quilt over, and block it again so that it is laying nice and square on the floor. I will ultimately tie the quilt top to the fleece backing after sewing the binding, so to prepare for this, I pin the top to the back while I have it laid out flat, as shown in the picture below. I like to place ties no more than 12″ apart, and I place the ties to compliment the overall quilt design. For this star surround pattern, I will tie in the center of the light pink stars, and in the center of the hourglass blocks, giving me a total of 13 ties.
    quanket

Part 2: Making a Quanket

quanket-part-2

Making a quanket
August 2015

I have now moved the blocks for this quanket from my design wall to the guest bed. Before completing the estimated needed blocks, I like to see how the design is coming together, and where I may want to make adjustments.

  1. As you can see in the picture, if I do the planned six full blocks down, I end with my center light pink stars not getting the hot pink star surround around them. So instead of doing six full blocks for the length, I will have five full blocks and add a half block at the top and bottom.
  2. The same will happen with the width. As reference, the top three rows have five blocks across. I will add a single row^ (1/4 of a block) on each side, to continue the pattern to the full width of the fleece backing.
    *The blocks are technically built off a standard 16-patch block pattern. I chose to have them finish at 9″. So, adding a row^ will add 2.25″ to each side.

I had calculated this quanket finishing at 4’x5′, but as it started to take shape on my design wall, I could see that I wanted the light pink stars to get the hot pink all the way around them. This adjustment will make the quilt finish more square than rectangle, but that’s okay. Luckily the fleece backing can accommodate the extra width.

Sometimes my quilts do not finish quite as I originally pictured in my head or sketched out. Between using scrap fabrics and sometimes getting lost in the calculations, I like to consider my process as being organic!

Part 1: Making a Quanket

Quanket

Making a quanket
August 2015

While I usually just post my finished quilts, I thought it might be fun to capture a bit of the process for making a quanket.

  1. This one began with the choice of the fleece backing, shown in the top of the picture: light and hot pink flowers, complimented with rust colored flowers. Sometimes I will begin a quilt by choosing the fabrics I want to use, sometimes a quilt block pattern I like, but in this case, fleece came first.
  2. Then off I went to my leftover stash and scraps drawers to see what I had in the pink and orange color values, and chose, so far, what you see in the picture.
  3. Next came finding a pattern that would work not only with the fabrics I had on hand, but also a design that would work nicely with the design on the fleece. This was a little more challenging than most of my other quilts that use solid color fleece for the backing. I liked Melissa Corry’s Star Surround quilt pattern, as it almost mirrors the flower design on the fleece.
  4. And now it is block building time. 9 down and 21 to go! If I did my calculations correctly, this will finish at 4’x5′.

I sew in a closet in my office. Yes, a closet. It is just a normal closet, about 2′ deep x 6′ wide. Years ago, when space here at home was at a premium, I converted the closet in my office to house my table sewing machine, supplies, etc., and put bi-fold doors on the closet to make the opening bigger when the doors are open. I have recently added felt to the bi-fold door (shown in the picture), which works exceptionally well for my design wall. Since it is on the closet door that is literally about 2 feet from my left hand, it is easy to sew a block and then stick it on the door!

My husband teases me that since we are now empty nesters, that we have plenty of room for me to ‘spread out’ and not sew in a closet. But, I’ve gotten so used to it over the years, I’m not sure what I would do with all that extra space around me! 🙂

Mr. Blue Sky

Mr-Blue-Sky

Mr. Blue Sky
July 2015

The center section is based off of a standard 16-patch block. I played with the color saturation, making half of each block light blue and half dark blue, with the color change occurring on the diagonal. I also played around with the arrangement of the blocks. It was amazing to see how with a simple rotation of each block, the entire quilt shifted to read either as light or dark blue. I preferred it “reading” as dark blue.

The fabrics were all from my scrap bin, from too many past projects to give mention to here! If you skim through my other quilts, many of the fabrics I used in Mr. Blue Sky will show up. And, while you’re looking through my other quilts, here is a fun song to listen to:

I donated this quanket to the County of Ventura, Children & Family Services, via the Children’s Services Auxiliary of Ventura County, in July 2015.

Don Diego

charity quilt

Don Diego
June 2015

Don Diego is named after Center Veterinary Clinic’s clinic cat. The cute cat fabric came from a donation of scrap fabrics I had received from them a few months back. Their clinic cat Diego sounds like he is quite a rascal! In addition to their donated fabric, I used leftover scrap fabrics from a variety of prior quilt projects.

This is the 50th donation quanket I have made. I typically like to finish one girl and one boy quilt and then take them over to the County of Ventura, Children & Family Services, via the Children’s Services Auxiliary of Ventura County. With the completion of Mr. Blue Sky, Don Diego was donated in July 2015.

Around the Table

charity quilt

Around the Table
June 2015

This is a framed squares quilt pattern. The center of each square came from a donation I received of a book of tablecloth samples. Carol reached out to me though my blog to let me know she had several tablecloth sample books that she would love to see used in a quilt. Thank you Carol for your donation!

The inspiration for the name was twofold: the first is obvious, that they were actually tablecloth samples. The second is perhaps not as obvious. As I sat sewing this quilt, I thought a lot about the many fond memories I have of gatherings around a table: Birthday celebrations, Thanksgiving and Christmas dinner with family and friends; times spent when my two girls were little playing games at the table and now with them and their families playing games around the table! The name Around the Table just seemed right for this one.

The overall design was inspired by Melanie over at Catbird Quilt Studio. I came across Melanie’s blog last month, and love how she uses borders in her medallion quilts. This is the perfect technique when quilting predominately with scraps, as it allows a quilt to grow to the desired dimension with (somewhat) ease and beauty. I only had enough of the tablecloth pieces in the chosen color values to get me to roughly 35″x50″. So, I borrowed a page from Melanie and added a border! The finish size came in right around 4’x5′, which is the size I aim for when making quankets for kids. The frames around the tablecloth sample pieces were all scraps from previous projects, while the edge binding was a new piece. When done, there were over 70 different fabrics that went into this quilt!

I donated this quanket to Diana Jasany’s Girl Scout Gold Award project. You can follow Diana’s journey on her Facebook page. I am so thrilled to have found two kindred spirits over the past month who make quilts for foster kids: the fist being Nita who blogs at Because You Matter and now Diana!

Quilting is more fun than Housework

Eeek

charity quilt

Eeek
May 2015

This is a log cabin quilt. Yes, I went back to familiar territory and did a traditional, symmetrical quilt this time around 🙂  Below is a close up of the fabric that inspired the name I chose – I think it’s perfect for a boy’s quilt!

Bugs

The orange fabrics, with the exception of the edge binding, were all donations, while the namesake was leftover from a quilt I made 12 years ago for my nephew.

I donated this quilt visa vie the Hands2Help Charity Quilt Challenge 2015. I chose to donate it to Nita who blogs at Because You Matter since her goals and focus are similar to mine: to make and give a quilt to a person who is having a hard time and would be comforted by a handmade quilt to snuggle up in, particularly children in foster care.

Confessions Of A Fabric Addict

Flamingo Floyd

charity quilt

Flamingo Floyd
May 2015

This quilt was inspired by Doris Brunnette’s (madebyabrunnette.com) Diamond Dust quilt which won 1st place at the Modern Quilt Guild’s QuiltCon 2015.

As someone who loves symmetry – and started quilting long before quilts with a modern aesthetic began gaining momentum in the early 2000’s – doing an asymmetrical quilt is quite a step outside of the proverbial box for me! While Doris’ design uses more solid color and negative space, I don’t have many “pieces of the past” fabrics that are solid colors. The white/black fabric was from Granny, while the flamingo fabric was a donation fabric.

I donated this quilt visa vie the Hands2Help Charity Quilt Challenge 2015. I chose to donate it to Nita who blogs at Because You Matter since her goals and focus are similar to mine: to make and give a quilt to a person who is having a hard time and would be comforted by a handmade quilt to snuggle up in, particularly children in foster care.

Confessions Of A Fabric Addict